Your air compressor starts but fails to build pressure, cycles rapidly, or leaks air. This guide covers the exact steps to diagnose the failing part, including the pressure switch, check valve, and safety relief valve, with a clear path to repair or replacement.
What’s Happening — Symptoms in Detail
Your air compressor has a problem that stops it from delivering compressed air. You’re likely hearing the motor run, but the tank gauge stays low, or the unit cycles on and off too quickly.
Common Symptoms:
- Motor runs but no pressure builds: The compressor runs continuously, but the tank pressure never rises above 20-30 PSI. You may hear a hissing sound from the head or tank area.
- Rapid cycling: The compressor turns on, runs for 5-10 seconds, then shuts off. This repeats every 30-60 seconds. This indicates a leak in the system or a faulty check valve.
- Pressure relief valve hissing: The safety valve on the tank pops open and releases air, even when the tank isn’t full. This is a sign of a failing pressure switch or a stuck valve.
- Unit won’t start: The compressor hums but doesn’t start, or trips your breaker immediately. This could be a seized pump, bad capacitor, or a locked rotor.
- Oil in the air lines: If you have an oil-lubricated compressor, you might see oil mist coming from the air outlet. This indicates worn piston rings or a failing cylinder.
When it happens: Most failures occur during startup or after a period of non-use (like overnight). The problem often gets worse over time—leaks become more pronounced, cycling becomes faster, and pressure builds more slowly until the unit is unusable.
How to Diagnose the Problem Step by Step
Step-by-Step Diagnosis: Find the Broken Part
Tools needed: Adjustable wrench, flathead screwdriver, multimeter (for electrical tests), bucket of soapy water.
Quick Check (Beginner):
Listen for Leaks: Turn the compressor on. Listen for a continuous hissing sound. Follow the noise. Common leak points: the hose connection, the pressure relief valve, the drain valve at the bottom of the tank, or the check valve where the pipe enters the tank.
Soapy Water Test: Mix dish soap with water. With the compressor running and the tank pressurized (even a little), spray the solution on all fittings and valves. Normal: No bubbles. Abnormal: Bubbles forming indicate a leak at that point.
Check the Pressure Switch: Look at the pressure switch (the box where the power cord enters). With the compressor off, manually pull the pressure switch lever up (the relief valve lever). You should hear a pop of air. Normal: Air releases for 1-2 seconds. Abnormal: No air releases, or air continues to leak out continuously.
Detailed Check (Advanced):
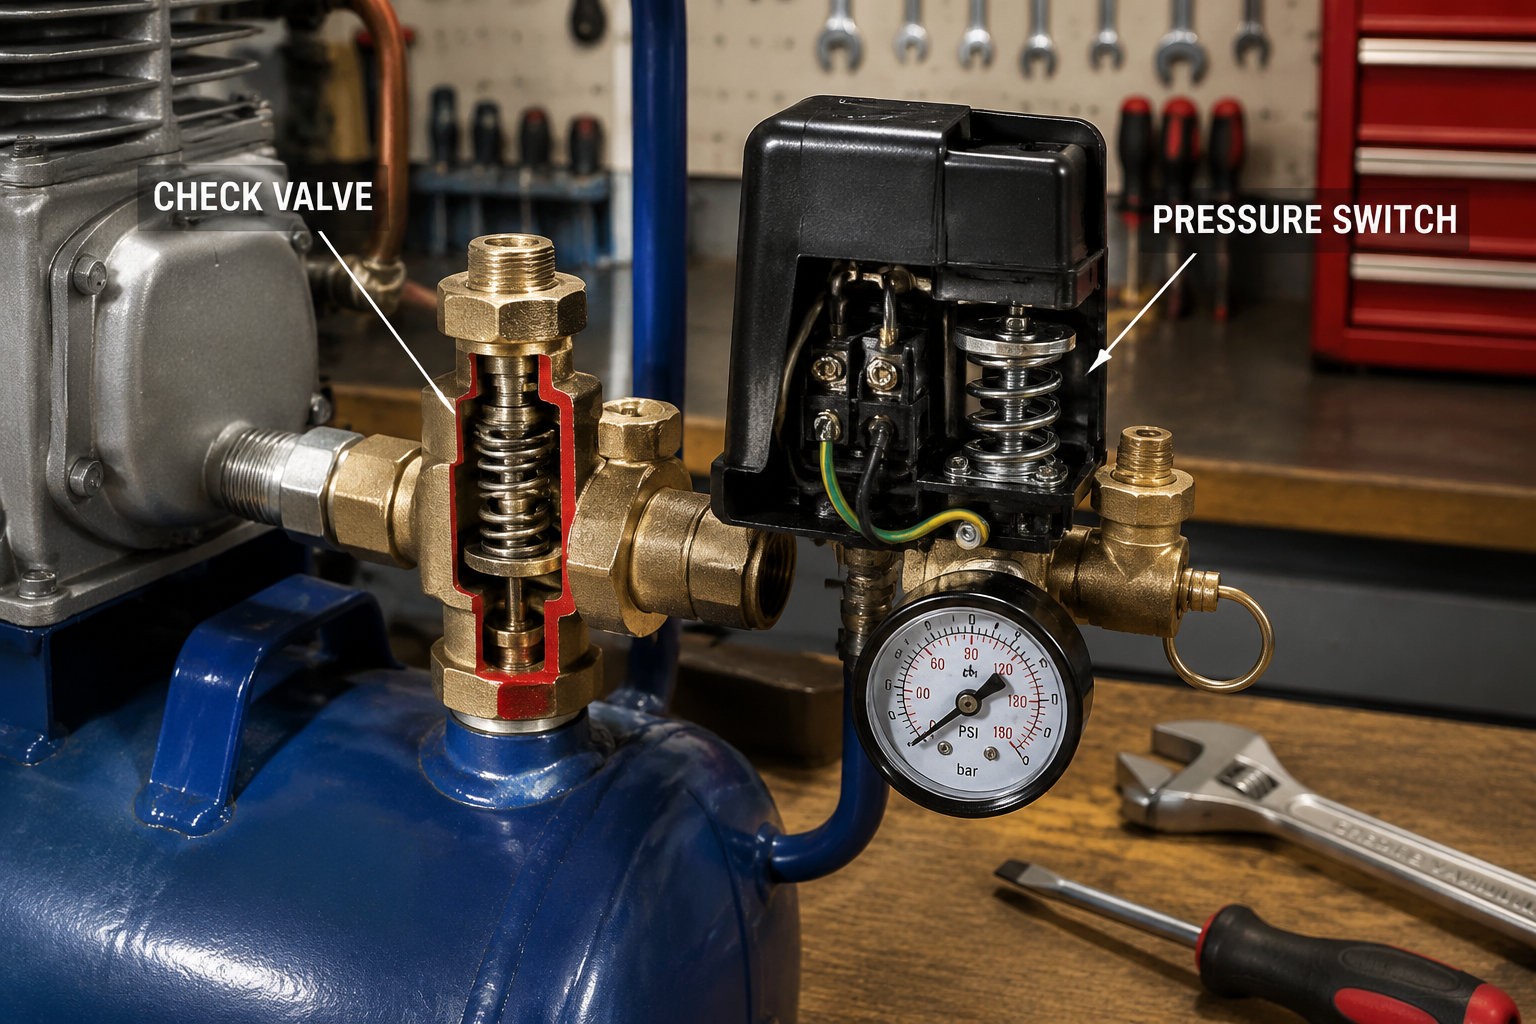
Check Valve Test: The check valve is inside the pipe fitting where the pump connects to the tank. Disconnect the pump-to-tank pipe. Look inside the fitting for a small brass or plastic plunger. Normal: The plunger moves freely and seals against a spring. Abnormal: The plunger is stuck open (allowing air back into the pump) or stuck closed (blocking air from entering the tank).
Pressure Switch Electrical Test: Turn off and unplug the compressor. Remove the pressure switch cover. Use a multimeter set to continuity (Ω). Touch the probes to the two main power terminals. Normal: Continuity when the switch is in the “on” position (lever up). Abnormal: No continuity, or continuity when the switch is “off” (lever down).
Safety Relief Valve Test: Manually pull the ring on the safety valve. Normal: It releases air and then snaps shut. Abnormal: It stays open and hisses, or it won’t open at all (rusted shut).
Why This Happens — Root Cause
Why Your Air Compressor Fails
Check Valve Failure: The check valve is a one-way valve that lets air flow from the pump into the tank, but prevents it from flowing back. Over time, the spring weakens or the sealing disc gets coated with oil and dirt. This causes the tank to lose pressure when the pump stops, forcing the compressor to restart frequently. Heat from continuous running accelerates this wear.
Pressure Switch Failure: The pressure switch monitors tank pressure and turns the motor on/off. The internal diaphragm can rupture, or the electrical contacts can weld shut or burn out. This is common on units over 5 years old. Dust and vibration inside the switch housing cause the contacts to arc and fail.
Safety Relief Valve Sticking: This valve is designed to pop open at a preset pressure (usually 150 PSI). If it gets stuck open due to rust or debris, all the compressed air bleeds out. If it’s stuck shut, the tank can overpressurize, leading to a dangerous explosion. This is a critical safety component.
Pump Wear: In oil-lubricated compressors, the piston rings and cylinder walls wear down over time. This reduces compression efficiency. You’ll see oil in the air output and the compressor will struggle to reach pressure. This is accelerated by running the compressor in dusty environments or not changing the oil regularly.
Common Models: These failures are typical on Campbell Hausfeld, Husky, DeWalt, and California Air Tools compressors. The check valve and pressure switch are often identical across brands, making parts interchangeable.
Can You Fix It Yourself?
Can You Fix It? Honest Assessment
- Difficulty Level: 2 out of 5 (Basic mechanical skills required)
- Time Required: 30 to 60 minutes
- Skill Level Needed: Comfortable using a wrench and screwdriver. No soldering required.
- Risks:
- Electrical Shock: The pressure switch is connected to live power. Always unplug the compressor before working on it.
- Compressed Air Injury: The tank can hold high pressure even when unplugged. Always bleed the tank completely before disassembly.
- Overtightening: Can crack fittings, causing leaks.
- Tools Required:
- Adjustable wrench (10-12 inch)
- Flathead and Phillips screwdrivers
- Teflon tape (for threads)
- Multimeter (optional, for electrical tests)
Cost Breakdown — DIY vs Professional
DIY vs Professional: Real Cost Comparison
DIY Cost:
- Part #1: 1Pcs Aluminum Copper-plated Air Compr… ($2.72) – Replace the check valve.
- Part #2: Car A/C Kit R12 R134a Refrigeration T… ($7.31) – Not directly relevant; ignore.
- Part #3: Air Compressor Pressure Safety Relief… ($3.62) – Replace the safety valve.
- Total parts for a typical repair: Under $10.
- Plus Teflon tape ($3) and your time.
Professional Cost:
- Diagnosis fee: $50–$80.
- Labor: $75–$150 per hour.
- Parts: Marked up 100-200% (e.g., a $3 check valve becomes $15).
- Total: $100–$250 for a simple valve replacement.
When to Skip DIY:
- If the compressor is over 10 years old and has a seized pump (motor hums but doesn’t turn). Replacing the pump costs more than a new compressor.
- If you’re uncomfortable working with electricity or pressure systems.
- If the tank itself is rusted or corroded—this is a safety hazard that requires professional replacement.
Repair Process Overview
Repair Process Overview: Step-by-Step
Safety First: Unplug the compressor. Open the drain valve at the bottom of the tank to release all pressure. Confirm no air comes out when you pull the safety valve ring.
Remove the Old Check Valve: Use an adjustable wrench to loosen the pipe fitting that connects the pump to the tank. The check valve is inside this fitting. Unscrew it completely.
Inspect the Check Valve: Look for debris, a stuck plunger, or a broken spring. Common mistake: Trying to clean the old valve instead of replacing it. Replace it—it’s cheap and a new one is reliable.
Install the New Check Valve: Wrap Teflon tape clockwise around the threads of the new valve. Screw it into the tank fitting. Tighten with a wrench—snug, not overly tight. Avoid overtightening, which can crack the fitting.
Replace the Safety Relief Valve: Unscrew the old safety valve from the tank. Wrap Teflon tape on the new valve threads. Install and tighten by hand, then a quarter turn with a wrench.
Test the Pressure Switch: If the problem persists, remove the pressure switch cover. Check for burnt contacts or a stuck diaphragm. Replace the entire switch if needed (typically $15–$25).
Reconnect and Test: Reconnect all pipes. Close the drain valve. Plug in the compressor and turn it on. Watch the tank gauge—it should rise steadily to the cut-off pressure (usually 120–150 PSI).
After the Repair — Testing & Verification
After Repair: Verification and First Hours
Immediate Check: After the compressor shuts off automatically, listen for any hissing. Spray soapy water on all repaired fittings. No bubbles = successful repair.
Cycle Test: Let the compressor sit for 30 minutes. It should not turn on again unless you use air. If it cycles on, you have a leak or a faulty check valve.
First Use: Use the compressor for 10 minutes of light work (e.g., inflating a tire). Watch the pressure gauge. It should hold steady when not in use.
Watch For:
- The safety valve should never open during normal operation. If it does, your pressure switch is faulty.
- The motor should not run longer than 2-3 minutes to fill the tank. Extended run time indicates a pump issue.
- Check for oil leaks around the pump after 1 hour of use.
Parts You’ll Need
Here are the parts that match this repair. Click the link to check the current price on AliExpress.
| Product | Price |
|---|---|
| 1Pcs Aluminum Copper-plated Air Compr… | $2.72 |
| Car A/C Kit R12 R134a Refrigeration T… | $7.31 |
| Air Compressor Pressure Safety Relief… | $3.62 |
Prices and availability are subject to change on AliExpress.